Did you just install XBMC? Were you not completely wooed by the basic offerings available in the official XBMC plugin repository? Then you may need to go unofficial. This is one of those do at your own risk posts. It may be for you, it may not.
If nothing else, this is fun to try from an experimentation point of view. It kind of reminds me of the old days of the big ugly satellite dish. You can spin that thing around and tune in stuff you did not even know existed. Including back-haul feeds from sporting events and things that would make me blush....
I personally love all of the offerings in the official XBMC repository. It is enough for me because I don't really watch that much TV. I am too busy writing blog posts and trying to save the world from myself. When one is in the mood to sit in front of the TV for days on end one should go to the Navi-X plugin.
Navi-X is what I like to call a super scraper. When you install it, it is located under the programs menu option in XBMC. Go to search Navi-X. Type in a movie you want to see. Let's say you want to see the 1970's Woody Allen classic Bananas. Yep, you got it, it is out there, along with about any other movie you would want to see. (For you die hard Bananas fans, it is also available free on Amazon.com Prime streaming.) Isn't technology amazing? Now this probably is fed from Russia or some other country that does not care about the movie laws of the world, so expect issues, if not now, eventually there will be issues.
It is not just about movies, there are old TV episodes, cartoons, or just about anything else you can think of in this super scraper. Do some creative searching and see what you come up with.
You can figure out all of this stuff and how to get other plugins for XBMC at www.xbmchub.com. Need a quick primer on how to install XBMC and Linux? Check out a previous post here.
If you like this post and think it would be valuable to someone you know, please share it on the social network of your choice for me, okay? All you have to do is click one of the buttons below. Then add me to your Google+ circles. Thanks
--Rick
http://gplus.to/rickbolt
Roku.com - The Affordable On Demand Player! Click here! - 30-day Money Back Guarantee
Wednesday, November 14, 2012
Wednesday, November 7, 2012
The DIY HDTV Antenna
I have an old HD Tube TV in the garage that someone gave me. I mounted it up high in the corner and plugged a store bought antenna in and the reception was horrible!!!! Now I am only about 20 miles from the metro area, so my local channels should come in much better than that.
So to the interwebz I went! I found some plans for a DIY DB8 antenna made from wood, screws, wire, and a balun (coax transformer). I had all of this material lying around the Geek's Garage, so I decided to give it a try.
I set about building it on a rainy Friday evening while watching my son's high school football game on TV. Luckily the store bought antenna picked this channel up. It is much warmer and dryer in the Geek's Garage and a great place to spend a Friday evening. Well, it is warmer and dryer than a high school football field in October.
The layout is pretty simple. The full diagram with measurements is shown here. Print this out for future reference. This thing is a monster! Be sure to be as precise as possible with your measurements. It took me about an hour to build and I really took my time it was very easy.

As I said, this thing is pretty big. Be careful not to bump the wires around when moving it. I hoisted up to the attic and hooked it up to the TV. At first, I was disappinted, no signal. I then played around with the placement. I found out it is very directional. Once I had it facing the metro area (I am Northeast, so I pointed it Southeast), it picked up all of the channels very nicely. I was impressed with the signal stregth of all of the local channels. I would defineitely recommend building one of these yourself. You can save money and have fun building it!
If you like this post and think it would be valuable to someone you know, please share it on the social network of your choice for me, okay? All you have to do is click one of the buttons below. Then add me to your Google+ circles. Thanks
--Rick
http://gplus.to/rickbolt
Roku.com - The Affordable On Demand Player! Click here! - 30-day Money Back Guarantee
So to the interwebz I went! I found some plans for a DIY DB8 antenna made from wood, screws, wire, and a balun (coax transformer). I had all of this material lying around the Geek's Garage, so I decided to give it a try.
I set about building it on a rainy Friday evening while watching my son's high school football game on TV. Luckily the store bought antenna picked this channel up. It is much warmer and dryer in the Geek's Garage and a great place to spend a Friday evening. Well, it is warmer and dryer than a high school football field in October.
The layout is pretty simple. The full diagram with measurements is shown here. Print this out for future reference. This thing is a monster! Be sure to be as precise as possible with your measurements. It took me about an hour to build and I really took my time it was very easy.
As I said, this thing is pretty big. Be careful not to bump the wires around when moving it. I hoisted up to the attic and hooked it up to the TV. At first, I was disappinted, no signal. I then played around with the placement. I found out it is very directional. Once I had it facing the metro area (I am Northeast, so I pointed it Southeast), it picked up all of the channels very nicely. I was impressed with the signal stregth of all of the local channels. I would defineitely recommend building one of these yourself. You can save money and have fun building it!
If you like this post and think it would be valuable to someone you know, please share it on the social network of your choice for me, okay? All you have to do is click one of the buttons below. Then add me to your Google+ circles. Thanks
--Rick
http://gplus.to/rickbolt
Roku.com - The Affordable On Demand Player! Click here! - 30-day Money Back Guarantee
Friday, November 2, 2012
Inspection Passed!
The Geek's Garage is good enough for the city! All wiring and final inspections are complete! Time to get the game on with some organization. After the organization, the projects will flow.
I have been researching the Apple TV box. This looks promising. One jailbreak and install of XBMC and this could be the ultimate TV device to help me get rid of cable! More to come soon...
I have been researching the Apple TV box. This looks promising. One jailbreak and install of XBMC and this could be the ultimate TV device to help me get rid of cable! More to come soon...
Friday, October 19, 2012
Cutting the Cable TV Cord...What are my options?
Are you looking to cut the cable TV cord?
First option: The easiest option that requires the least tech savvy is the the Roku. This is a great little box. This is probably the best Netflix streaming device out there. No hassles, just plug it in and go. Netflix is not the only thing this does. It also does Pandora, BlipTV, some local news channels, Amazon Video on Demand, and many other things. I would recommend these on all of the secondary TVs. There are a surprising number of options available to use on this simple little inexpensive box.
Roku.com - The Affordable On Demand Player! Click here! - 30-day Money Back Guarantee
Option number two is to build an XBMC box on Linux. You can even use the XBMC Live distro to try it on a PC without having to install anything. If you want to install XBMC and Linux on a PC, I wrote a basic post about it here. The only problem with this option is that you can't run Netflix on Linux as their plugin does not support Linux at this time. There are ways around this, but that is for another post. Although, this is not really a problem for me because I use my $50 Roku to stream Netflix. I pull all other kinds of content down with XBMC. I also use it as my music server. It pulls all of the music from my NAS (another upcoming post) and plays it on my living room stereo. I also use it for multiroom audio with an XBMC plugin. I love it! Who needs cable TV? Not me!
Now, if you are very geeky, I would try option number three. Warning: I have not attempted this yet, but would like to in the future. This is not for your average geek, It will require a significant time investment. And lots of research and geekines. Option number three involves building your own micro media center PC. These have come a long way from the days of having a mini-tower with loud fans running next to your TV. They now have these little netops that are fanless, so they make no noise at all!
One of these netops is the Zotac Zbox. It is a powerful little box that is a good base for your media center experience. Now, be aware, most of these are sold barebones. Your first geek hurdle you will have to overcome is to add memory and a hard drive and any other components you will need.
After you have succeeded in adding your components, you can almost end your geekiness there if all you want to do is run XBMC. All you have to do is get XBMC Live version on a USB stick and set your Zotac to boot from it. Now you can enjoy your XBMC Media Center. We would not be geeks if we did not want to do more! Here we want much more out of our media center.
If want to do Netflix streaming This is one of those very rare instances that I would recommend Microsoft Windows over Linux. As I said above, Netflix is not currently supported under Linux. Once you install Windows 7, you can have a full working media center PC with Netflix streaming. If you really want to attempt this you can start your research here and here.
Here is the Zbox....
If you like this post and think it would be valuable to someone you know, please share it on the social network of your choice for me, okay? All you have to do is click one of the buttons below. Then add me to your Google+ circles. Thanks
Thursday, October 18, 2012
You may have noticed there have not been any weekend projects for the last couple of weeks. Youth football and the final garage inspection preparation has kept me from new projects.
The final inspection on the garage will happen in a couple of days, if that passes, I will be back on general emergency projects. Then I plan to move to some garage organization projects and some photography and PC projects.
More to come soon. In the meantime enjoy some youth football photos that I have taken....

Monday, September 17, 2012
The E36 Garage
My name is Rick and I own an E36. I can't help it, it is an addiction. I do love my car. After all it is almost 15 years old and it still gets about 27 mpgs... and it still looks good! Here is a picture of my baby:
 Another thing that I love about this car is the following that they have. There are several internet sites that document problems/fixes with these cars. I am not a trained mechanic, but I love to work on this car. These sites help guide me in the right direction and suggest troubleshooting methods and tools (full list of sites I use at the end of this post). I have already done several things to her. For instance, I just replaced the front struts. After scouring on the internet for the best deal, I found the struts for under $200. This also gave me an excuse to buy a new cordless impact wrench to do the job with. So all in all, I had $300 in the strut replacement. A friend of mine said she took hers in to get an estimate to have the front struts replaced and they quoted her $1500!!!! Glad I could do this one myself. It was even kind of fun. I have also changed rear wheel bearings (not recommended), changed brakes (easy), replaced alternator, and many other things.
Stay tuned for more E36 projects. I plan to document a few more projects with pictures and reference the guide or website I use. Hopefully, I can help out some other E36 owners.
Links are below. Save some money and stay geeky....
E36 links:
blog.bavauto.com
www.bimmerforums.com
www.dvatp.com/bmw/diy/
www.bavauto.com --this is where I buy most of my parts.
You are right: you don’t have to comment or share, but do it anyway; I love hearing from you!
Wednesday, September 12, 2012
This Wednesday's Project--Clean DSLR Sensor
OK, first of all, to all you other geeks out there, do this at your own risk. I am not responsible for your work...With that said, let's get geeky!
I love photography. I love capturing moments that would otherwise slip away forgotten forever. It is a passion of mine. One thing that I don't like is sensor dust. Sensor dust shows up as those noticeable dots when you shoot a beautiful clear blue sky. Nothing can ruin your picture faster than dust on your sensor. Sure, you could fix this in post processing with Photoshop's healing brush, but time is money, and we are all about saving money and time, and whatever...let's get to it!!!
First, here is a "save the date" picture I took for this stunning young lady I know. Great theme right? They are getting married on 5/29, so the two football junkies line up posed in front of the field goal, perfect shot and BAM!!!!!! Sensor dust!@!@!@!@! WHAT???? More post processing!?!
One way to fix it is to push your Bleached Bypass version of another photo.
Well, the lovely bride to be really wants the Lucas Art sculpted version. Well to prevent this form happening again, you are going to have to get your sensor cleaned.
I use a Nikon D40 DLSR for most of my shooting. I use a lot of really old manual lenses and change them out often. So I am going to be getting lots of dust in there. I could take it and get it cleaned several times a year, but that gets expensive and I don't like to be without my camera. So I went out and purchased some sensor cleaning tools. I purchased these at Amazon.com. They are very reasonable.
First, let's try to blow out the dust with the Rocket Blaster! You need to go into your settings on your camera and set the mode to mirror lockup or sensor clean. After you push the shutter, the mirror will stay up and the shutter will stay open until you turn the camera off. It is very important that you have a fully charged battery, you don't want your shutter closing on your tools, it will ruin your shutter and that will be costly in time and money.
With the mirror and shutter out of the way, send some blast of air over the sensor. Now the instructions state to hold your camera body upside down to be sure that any loose dust is handled by gravity and falls out of the camera.
Next, let's try the lens pen. Now this is scary!!! You actually have to touch the pen to the sensor to clean it. Go through the mirror lockup we just discussed again. Now with your sensor exposed, swipe the sensor with the lens pen. I gave mine a blast with the rocket blaster a few more times too.
Now turn your camera off and put it all back together. Take another picture of the sky. Is that any better? Some, but still a little dust.
So I used the Lens Pen a second time. This time paying attention making sure I covered the whole sensor with the Lens Pen. Then I blew it out one more time and put it all back together. The directions to say to blow it out after using the Lens Pen. Finally, most of the sensor dust seems to be gone!
I have to say that I am very pleased with this purchase. Major amounts of dust removed in my opinion. I think a combination of these two tools will help you keep your sensor dust at bay. The best part of it is that they are reusable. The Lens Pen claims you get up to 500 uses out of it. So for about $20 for both tools, I am able to clean my sensor approximately 500 times. Remember, be very careful doing this. One slip up and it will be a very costly mistake. Keep your battery fully charged while doing this....If you feel like for any reason you can't do this, please respect your camera and take it in to get cleaned at your local camera shop.
Remember, save money and stay geeky!
If you like this post and think it would be valuable to your followers, please share it on the social network of your choice for me, okay? All you have to do is click one of the buttons below. Thanks
I love photography. I love capturing moments that would otherwise slip away forgotten forever. It is a passion of mine. One thing that I don't like is sensor dust. Sensor dust shows up as those noticeable dots when you shoot a beautiful clear blue sky. Nothing can ruin your picture faster than dust on your sensor. Sure, you could fix this in post processing with Photoshop's healing brush, but time is money, and we are all about saving money and time, and whatever...let's get to it!!!
First, here is a "save the date" picture I took for this stunning young lady I know. Great theme right? They are getting married on 5/29, so the two football junkies line up posed in front of the field goal, perfect shot and BAM!!!!!! Sensor dust!@!@!@!@! WHAT???? More post processing!?!
 | |
| Sensor dust shows up as dots in the sky! |
 |
| Isn't beautiful, no sensor dust. Fixed with Photoshop....too much work! |
Well, the lovely bride to be really wants the Lucas Art sculpted version. Well to prevent this form happening again, you are going to have to get your sensor cleaned.
I use a Nikon D40 DLSR for most of my shooting. I use a lot of really old manual lenses and change them out often. So I am going to be getting lots of dust in there. I could take it and get it cleaned several times a year, but that gets expensive and I don't like to be without my camera. So I went out and purchased some sensor cleaning tools. I purchased these at Amazon.com. They are very reasonable.
 |
| Sensor cleaning tools |
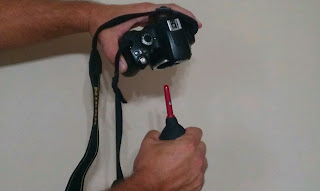
First, let's try to blow out the dust with the Rocket Blaster! You need to go into your settings on your camera and set the mode to mirror lockup or sensor clean. After you push the shutter, the mirror will stay up and the shutter will stay open until you turn the camera off. It is very important that you have a fully charged battery, you don't want your shutter closing on your tools, it will ruin your shutter and that will be costly in time and money.
 |
| The mirror is in the lockup position. That funky looking thing in the middle is the camera sensor. The flash makes it look like that. It really just looks kind of blue. That can't be me that dripped pizza sauce to the left. DO NOT EAT PIZZA WHILE CLEANING YOUR SENSOR!.....lol |
With the mirror and shutter out of the way, send some blast of air over the sensor. Now the instructions state to hold your camera body upside down to be sure that any loose dust is handled by gravity and falls out of the camera.
 |
| Holding the camera body upside down and blowing out with the Rocket tool. Calm down ladies!!! Those manly hands are taken! |
When you are satisfied you blasted enough, turn the camera off and put the lens back on. Now go out and take a picture of the sky. Do you see any dust? Well, I do....
 |
| Still see some sensor dust |
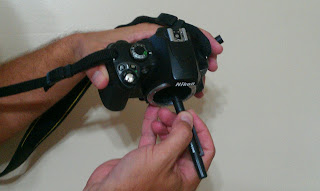 |
| Using the Lens Pen |
Now turn your camera off and put it all back together. Take another picture of the sky. Is that any better? Some, but still a little dust.
 |
| Still a little bit of dust |
So I used the Lens Pen a second time. This time paying attention making sure I covered the whole sensor with the Lens Pen. Then I blew it out one more time and put it all back together. The directions to say to blow it out after using the Lens Pen. Finally, most of the sensor dust seems to be gone!
 |
| Most of the dust is gone... |
I have to say that I am very pleased with this purchase. Major amounts of dust removed in my opinion. I think a combination of these two tools will help you keep your sensor dust at bay. The best part of it is that they are reusable. The Lens Pen claims you get up to 500 uses out of it. So for about $20 for both tools, I am able to clean my sensor approximately 500 times. Remember, be very careful doing this. One slip up and it will be a very costly mistake. Keep your battery fully charged while doing this....If you feel like for any reason you can't do this, please respect your camera and take it in to get cleaned at your local camera shop.
Remember, save money and stay geeky!
If you like this post and think it would be valuable to your followers, please share it on the social network of your choice for me, okay? All you have to do is click one of the buttons below. Thanks
Sunday, September 9, 2012
Yet Another Unexpected Weekend Project
I promise this blog will be more about tech and geek stuff rather than all automotive stuff, but it seems I have had a streak of bad luck with my Expy lately... Driving it on my rather long commute to work, I have been experiencing a massively irritating shudder.
Shudder, that is an interesting work. I actually felt at times the vibration was going to rattle my teeth out! I pulled the Expedition into the Geek's Garage to have a look. I crawled underneath, jacked it up, poked and prodded, but found nothing that really could be the cause.
So to the interweb I went! I went over to the Ford Trucks forum and did some searching. It seems this is a common problem with the Expedition. The fine boys over there explained to be that my Expedition has what is called a limited slip differential. There are clutches in there that keep the gears engaged and do other things that I don't understand. I guess when they get tired of the gear oil in that is in there, they start to "shudder"...And I though my truck was just allergic to my workplace. I guess I will keep my job.
OK, so, the mighty interweb says to change out the gear oil in the differential with 75/140 gear oil and add some friction modifier to it. Actually it says to add the friction modifier and then add the gear oil, but more on that later. The friction modifier (also called limited slip additive) comes in a toothpaste like tube near the gear oil.
As a warning, this is one messy and nasty job, I suggest you have lots of towels hand that you can throw away after you are done. Also, put some cardboard down to protect your floor, and by all means wear gloves. Gear oil is some of the nasty stuff and smells a bit the dead monkeys. Last time I checked, women were not impressed by dead monkey smell, so try your best to keep this stuff off of you and every thing else!
First you need to remove your old nasty gear oil from your diff. There are a couple of ways to do this. You can remove the back cover by taking off all of the bolts and then having to reseal it or you get yourself a suction pump and remove it from the fill hole. Since I wanted to do this as quickly as possible without the risk of leaks, I chose the suction pump route. Here is a picture of my hand powered suction pump.
It is a pretty basic tool. Stick the hose end in the fluid and pull back on the handle.
Next you will have to locate the fill plug on the differential. This is a small plug that has a square hole in it that your socket wrench will fit into. You need to be a little careful when removing so you don't break it or strip it, but my came off easily. Just in case, spray it with some lubricant, such as PB Blaster, the day before you try to take it off. That always helps speed it up. Here is a shot of my diff fill plug...
OK, there are no more pictures from here on out because as I said, this is a really messy job. I am a geek at heart, so my camera will not get near this dead monkey smelling stuff!
So next, remove your fill plug. Feed your hose end of your fluid suction pump into your diff. You will probably have to bend it and coax it in past the gears, but it will eventually go in. Once you get the hose in to near the bottom of the diff, slowly pull back on the handle of the fluid suction pump. It will fill up with gear oil. I had my oil pan nearby and dispensed with the old oil from the pump to the oil pan. This took several times until I could not get any more gear oil out. Now the diff is mostly empty.
Next I added my Limited Slip additive to the diff. It is hard to maneuver under there, but you will get it. Remember, be careful not to get this on you. It is nasty stuff. Your date will thank you later...
OK, now that you have put in the additive, it is time to put in the gear oil. Again, it is hard to maneuver under here, so take your time, you will get it. First I tried adding hoses to the end of the gear bottle, but I found it was easier and faster if I maneuvered the bottle into place and then placed my gloved finger over the end till I got to the fill hole and then released my finger and squeezed the oil in.
That is it. Don't forget to replace your fill plug and clean up the dead monkey smell off of everything. Take your Expy out for drive and make some turns or find a spot to do some figure eights to get your gear oil mixed good.
So far the shudder is gone. I will come back and update after a couple of weeks to see if that is still the case.
Remember, save money and stay geeky!
You are right: you don’t have to comment or share, but do it anyway; I love hearing from you!
Post Sponsor:
Shudder, that is an interesting work. I actually felt at times the vibration was going to rattle my teeth out! I pulled the Expedition into the Geek's Garage to have a look. I crawled underneath, jacked it up, poked and prodded, but found nothing that really could be the cause.
So to the interweb I went! I went over to the Ford Trucks forum and did some searching. It seems this is a common problem with the Expedition. The fine boys over there explained to be that my Expedition has what is called a limited slip differential. There are clutches in there that keep the gears engaged and do other things that I don't understand. I guess when they get tired of the gear oil in that is in there, they start to "shudder"...And I though my truck was just allergic to my workplace. I guess I will keep my job.
OK, so, the mighty interweb says to change out the gear oil in the differential with 75/140 gear oil and add some friction modifier to it. Actually it says to add the friction modifier and then add the gear oil, but more on that later. The friction modifier (also called limited slip additive) comes in a toothpaste like tube near the gear oil.
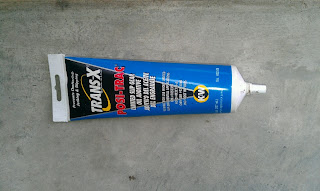 |
| Limited Slip Additive |
As a warning, this is one messy and nasty job, I suggest you have lots of towels hand that you can throw away after you are done. Also, put some cardboard down to protect your floor, and by all means wear gloves. Gear oil is some of the nasty stuff and smells a bit the dead monkeys. Last time I checked, women were not impressed by dead monkey smell, so try your best to keep this stuff off of you and every thing else!
 |
| Gear Oil |
First you need to remove your old nasty gear oil from your diff. There are a couple of ways to do this. You can remove the back cover by taking off all of the bolts and then having to reseal it or you get yourself a suction pump and remove it from the fill hole. Since I wanted to do this as quickly as possible without the risk of leaks, I chose the suction pump route. Here is a picture of my hand powered suction pump.
 |
| Fluid Suction Pump |
It is a pretty basic tool. Stick the hose end in the fluid and pull back on the handle.
Next you will have to locate the fill plug on the differential. This is a small plug that has a square hole in it that your socket wrench will fit into. You need to be a little careful when removing so you don't break it or strip it, but my came off easily. Just in case, spray it with some lubricant, such as PB Blaster, the day before you try to take it off. That always helps speed it up. Here is a shot of my diff fill plug...
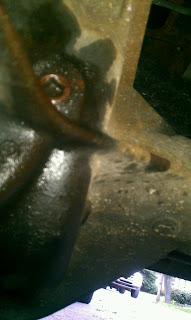 |
| Differential Plug Location |
OK, there are no more pictures from here on out because as I said, this is a really messy job. I am a geek at heart, so my camera will not get near this dead monkey smelling stuff!
So next, remove your fill plug. Feed your hose end of your fluid suction pump into your diff. You will probably have to bend it and coax it in past the gears, but it will eventually go in. Once you get the hose in to near the bottom of the diff, slowly pull back on the handle of the fluid suction pump. It will fill up with gear oil. I had my oil pan nearby and dispensed with the old oil from the pump to the oil pan. This took several times until I could not get any more gear oil out. Now the diff is mostly empty.
Next I added my Limited Slip additive to the diff. It is hard to maneuver under there, but you will get it. Remember, be careful not to get this on you. It is nasty stuff. Your date will thank you later...
OK, now that you have put in the additive, it is time to put in the gear oil. Again, it is hard to maneuver under here, so take your time, you will get it. First I tried adding hoses to the end of the gear bottle, but I found it was easier and faster if I maneuvered the bottle into place and then placed my gloved finger over the end till I got to the fill hole and then released my finger and squeezed the oil in.
That is it. Don't forget to replace your fill plug and clean up the dead monkey smell off of everything. Take your Expy out for drive and make some turns or find a spot to do some figure eights to get your gear oil mixed good.
So far the shudder is gone. I will come back and update after a couple of weeks to see if that is still the case.
Remember, save money and stay geeky!
You are right: you don’t have to comment or share, but do it anyway; I love hearing from you!
Post Sponsor:
Tuesday, September 4, 2012
Unexpected Weekend Project: Sunroof Leak
With all the needed rain we had this weekend, it also brought me a lot of trouble. While my car is getting fixed from the rear end collision I suffered, I was driving my backup. The beautiful Ford Expedition. It was raining so hard that I had a large leak that sprang from my sunroof when I was driving. I am not talking a few small drops, I am talking streams of water! Major streams of water!
After I got it home and started to dry myself off, I could hear water sloshing around in the sunroof area. I am not an extreme genuis by any means, but I know this is not good. I opened the sunroof and could see that water was pooling all around the sunroof opening. A quick internet search told me that there were drain tubes in the sunroof opening that are supposed to carry this water away. It appears they are plugged up! Here is a picture I snapped with the headliner slightly removed so you could see them.
See those gray tubes at the upper left of the photo? Those are the beauties that are clogged. Now how to unclog them? If you open your sunroof and look at the corners, you will see some holes. These are the drainage holes that lead to these tubes. I tried to get a picture of mine but it did not turn out very well.
Post Sponsor:

After I got it home and started to dry myself off, I could hear water sloshing around in the sunroof area. I am not an extreme genuis by any means, but I know this is not good. I opened the sunroof and could see that water was pooling all around the sunroof opening. A quick internet search told me that there were drain tubes in the sunroof opening that are supposed to carry this water away. It appears they are plugged up! Here is a picture I snapped with the headliner slightly removed so you could see them.
 |
| Gray tubes that carry water out of the sunroof |
 |
| Drain hole in the upper right area of this photo |
On the top right of this photo you can see a hole. Sorry, there are other things in the way, but they are right there in the corner of the sunroof. Mine were in the front corners, towards the front of the car. I have heard that others have them at all four corners. Mine only had the two front holes.
Now I had to figure out how to unclog the tubes. My tubes were made of a rubber so I was trying to be very gentle and not puncture them. First, I started to clean up the interior part of the sunroof. I mean the part that the glass covers from up above. I cleaned and scrubbed all of the dirt out really well. This I am sure is what caused my tubes to clog. I will now get up there and clean that out often to prevent this problem from happening in the future. Now to unclog the drain, I started with a small piece of copper wire. I stuffed it in the drainage hole trying to clear the clog. This did not work because the water was not disappearing. So I tried this several times with no luck
I went on the hunt for something rigid, yet more flexible than my copper wire. I finally stumbled across this:
 |
| Cable tie, the best sunroof drain unclogger! |
The ever multi-useful cable tie!. It was perfect. I was able to insert it into the drainage hole and clear the clog. I did this several times to make sure it was all cleaned out. I then grabbed a large cup if water and poured it into the sunroof area to make sure the drain was functioning. All was well.
So there you have it. About 2.5 hours of my life that I will never get back. Hopefully this will help someone else out there with a leaky sunroof....
Remember, save money and stay geeky!
You are right: you don’t have to comment or share, but do it anyway; I love hearing from you!
Post Sponsor:
Tuesday, August 28, 2012
Google+
I have been playing around a lot with Google+ lately. I know, I
know, you are saying "You are just now getting into Google+, you are
such a technological visionary.......not" Be nice! I am a busy guy.
OK, OK, no more excuses. On to the Google+ post.....
I guess it is touted as the perfect mix between Twitter and Facebook. I have to admit that I don't know either one of those very well, but I have been learning Google+ over the last several days. I must say, I really like it!
First, if you are not familiar with Google+, it is a social networking application that is based on groups called circles. You can create all kinds of circles to follow people. For example, I have some circles called Family, Friends, Photographers, Photoshop, and Bloggers. I can add different people to each of these circles and follow their work. If they feel like they want to see my posts, they can add me to one of their circles.
The main reasons why I like Google+ are because you can add people to your circles that have similar interests. In other words, you can follow people that you don't even know, but may be an authority on something you are really passionate about. For example, I love photography, so I have added several photographers to my photography circle so I can follow their work. There are some amazing photographs on Google+. The beauty of the circle concept is that I can send only my photography related content to my photography circle, or only my jokes to my friends circle, or even send a note to all people (public setting).
I am still building my circles. Once I have them close to finished, I can then share a circle. This will allow people to "subscribe" to the same people that I have built in my circles. This is an awesome concept that allows people to connect and share easily. This is where I think Google+ is better than Facebook, although I do admit, I am not a Facebook expert. What do you guys think about the comparisons of Facebook, Twitter, and Google+.
I would love to have you guys add me to one of your circles. Even if it is your "dorks" circle. I am OK with that. This blog is integrated with Google+, so if you add me, you will see all of my blog posts as a Google+ post. So please get to adding!
Here is my profile:
https://plus.google.com/101813403618499617525/posts
Or you can click the add to your circles button on the upper right area of this blog...
You are right: you don’t have to comment or share, but do it anyway; I love hearing from you!
Saturday, August 25, 2012
The E36 Alternator
Normally replacing an alternator is a breeze. Unless you don't have all of the information. One day I was backing out of my garage to head to work when I noticed my battery light came on. Since I have a decent commute, I decided to pull my baby back into the garage. I did some research and found out it was most likely the alternator. So here is where I made my first mistake. I went to Autozone and they sold me a replacement alternator. It does not come with a pulley. No big deal, right? I can remove the pulley form my old one and put it on the new one with my new impact. Solved...
So I did it, it took no time at all, and while I was at it, I replaced the belt. I took it to go see my son's baseball game and when I was almost there....Pop, crack, thump bang....battery light. I limp there and take a look. The belt is shredded so bad around the crank, I need to call a tow truck. Here is where the fun starts. I am researching like a mad man! I finally stumble on an obscure post that says the alternator pulley is only compatible with the same manufacturer that made the alternator. Guess what? During my car's year (1998) depending on the date it left the line, it could have a Valeo alternator, or a Bosch alternator. Autozone sold me a reman Bosch. I looked at my old one and it was a Valeo. The Valeo pulley is not compatible with a Bosch alternator. Stinko!!!!
Now what do I do? I need my baby back on the road. I do what any reasonable geek will do and go to the internet. I had several recommendations for this site that remanufactures and sells alternators. Alternator Pros is a first class business. I wanted to make sure they could sell me what I needed so I gave them a call. They were very helpful and did agree that the pulleys are not compatible and that they do indeed sell alternators with pulleys attached. I purchased one and put it on the car and my problems are gone. Lesson learned. If you need a good replacement alternator, go to Alternator Pros. Hopefully this will help other E36 owners. Remember....save money and stay geeky.
You are right: you don’t have to comment or share, but do it anyway; I love hearing from you!
Friday, August 24, 2012
Geeks Unite!
Another project we are working on in The Geek's Garage is the Hackintosh. We have already successfully built one using a iDeneb. Just Google around and you will find it. I have to admit, this was a bit of a challenge. It is much easier to go out and buy a used iMac on ebay. I actually may end up doing that because I use Photoshop often for other projects that I have here and it is much more reliable with a real Mac.
But, that is not what it is about is it?!? We are all about the fun of the project. Our next project will involve installing a Hackintosh from a retail Snow Leopard DVD. This should be a lot of fun to try . I will use info provided by TonyMacx86. Step by steps and multipart posts to come....
One of the sites that we love here at The Geek's Garage is Lifehacker. They list all kinds of geeky projects and are home to the always up to date Hackintosh guide. If you are a fan and have some documented projects, contact me, I would love to have a few guest posters.
Free TV the XBMC Way --Part 1
I hate cable TV!!! That is even a sugarcoated statement. I truly despise it. If it was not for the rest of my family, it would be gone forever from my house! I have one TV in my house that is known as "daddy's TV". My four year old coined the phrase. "Daddy's TV" does not have cable tv hooked up to it. All it has is a Roku and an XBMC box.... but I am slowly losing control over my beloved library TV. So I thought, why not add a man screen to the garage and bring back "daddy's TV".
This is project number one here at the Geek's Garage. I picked up free HD tube TV that had some overheating issues. I could fix it probably by replacing some caps in the power supply, but you know what? In my garage in the winter months when I will be watching it, it won't be an issue. The best part about this TV is that it has a VGA input...
Next, I dug up some old computer parts I found an old 1.6 Mhz AMD, 1 GB memory, and about a 20 GB hard drive lying around doing nothing but collecting dust. For the man screen project, I don't have to worry about waf (wife acceptance factor). I know it will be ugly, but hey, it is in the garage! Remember, all hardware is different, your mileage may vary. If you have problems setting yours up, it will be with hardware and linux. I will go over the issues I had, but I can guarantee they will be different from yours. When you have issues, check the XBMC forums. I bet your question has already been answered.
My computer is old, so it does not boot from USB. That defeats the purpose of XBMC Live for me. Therefore, I must go out and download the minimum Ubuntu install to get this party started! I downloaded the minimum install here and burned it to a CD. What version you decide on is up to you. Since I have old hardware, I think I used 10.04.... I followed the guide located here. The only problems I had were with my video card. I had an older NVIDIA video card. I had to go download the old version 96.xxx drivers and install those with the Ubuntu minimal install and everything worked out fine.
Now comes one of the negatives, Netflix is not compatible with Linux yet. You have to have Windows or Mac OSX running to get the Netflix plugins to work. Since I have the Roku for Netflix movies, I prefer the Linux way, but that is a decision will have to make.
Now I have XBMC running on this box. For those of you unaware, XBMC is one of the best media center apps out there. Not only can it scrape video and TV content off the web, it can also be used as a music server, multiroom audio distribution, a video game console and many other things...you can find out more information about XBMC features here.
I will continue this post in multiple parts...
Save yourself some money and stay geeky.
You are right: you don’t have to comment or share, but do it anyway; I love hearing from you!
Post Sponsor:
Not ready to take the geeky dive to XBMC?
Check out the ROKU. It is the easy way to stream!
Tuesday, August 21, 2012
The Garage
A few years back, I purchased an old house that had no garage at all. After a couple of years getting the house livable, I had a really nice garage built in the back of the house. It is awesome! 22' X 32'... I am almost ready for the final construction inspection, then the projects will start! This blog is where I will document my man garage happenings and projects that occur in The Geeks Garage...
Potential Projects:
1) BMW E36 fixes and mods
2) Speaker building and audio
3) General constructions and building --Anything house related
4) Random sports rants!
5) Computer/network related projects
6) Side business and income streams
7) Any other manly things I can think of....
And of course....There will always be snippets of entertaining random man wisdom...
Subscribe to:
Posts (Atom)